Get Started with Messaging Autoresponder
Introduction
Set up an autoresponder for your 10DLC, Short Code, or Toll-Free messaging campaigns.
Autoresponder
To be compliant with SMS/MMS Application-to-Person (A2P) Messaging, it’s required that senders support standard keyword interactions so their audience can opt-in, opt-out and get customer care information through text messaging. Voxology’s Autoresponder makes compliance simple. We are listening for a standard list of keywords used for opt-in, opt-out and customer care and will send a predefined response.
Further, for customers who want a broader list of keywords and more advanced message flows, the control-flow Call Flow Actions used in Programmable Voice can also be used on Programmable Messaging to define custom responses.
How It Works
Keyword Detection
Overview
Messaging Keywords are one-word messages anyone can send to your phone numbers to either opt-in, opt-out or get help. Ingesting these keywords and responding to them promptly is mandatory to be compliant with regulations governing A2P messaging.
To make compliance simple for our users, Voxology has built-in keyword detection for messages with an exact match on some of the most common keywords. When a keyword is detected, we notify you in the Inbound Message Callback Request. The callback will include which keyword was detected and the type. All sms-enabled numbers inherit this feature.
Keywords Detected
- Opt-In Keywords //
START,SUBSCRIBE - Opt-Out Keywords //
STOP,UNSUBSCRIBE,CANCEL,QUIT,END - Help Keywords //
HELP,INFO
Callback Parameters
keyword_detected// the keyword detected on the inbound message, from the list abovekeyword_type// the type of keyword detected,Opt-Out,Opt-In,Help
Messaging Blocklist
When an Opt-Out keyword is detected on an inbound message, the sending number is automatically added to the Messaging Blocklist for your Voxology Application. All future attempts to message that number will fail with an ‘opt-out’ status until the number sends an Opt-In keyword to remove themselves from the Messaging Blocklist. The scope of the blocklist varies based on the number type (10DLC, Toll-Free, Short Code).
Blocklist Scope
- 10DLC // Blocklist applies to all numbers on the same 10DLC Campaign as the number that received the Opt-Out keyword.
- Toll-Free // Blocklist applies only to the Toll-Free number that received the Opt-Out Keyword.
- Short Code // Blocklist applies only to the Short Code that received the Opt-Out Keyword.
Getting Started
Get started with the subscriber managment for messaging.
Voxology Autoresponder
Overview
When enabled, the Voxology Autoresponder will automatically send a response to any of the keywords captured by our Keyword Detection feature described above. We include a parameter, auto_response, in the Inbound Message Callback Request, indicating an auto response was triggered by an inbound message.
Auto-Response Messages
If your number is registered to a 10DLC campaign with defined Opt-In, Opt-Out and Help keyword responses, those messages are automatically synced to the Voxology Autoresponder and will be sent in response to the appropriate keywords.
If not, the default messages listed below will be used.
- Opt-In // “You’ve successfully opted-in to receiving text messages. Reply STOP to cancel at any time.”
- Opt-Out // “You have unsubscribed and will receive no further messages. Reply START to re-subscribe.”
- Help // “Reply STOP to cancel all future messages. Reply START to re-subscribe.”
Prerequisites
- Receive Messages Getting Started Guide // Make sure that you have completed the Receive Messages tutorial.
Tutorial
1. Enable The Voxology Autoresponder
The Voxology Autoresponder is enabled on a per-number basis by updating the Callback Configuration for the number. If set on the Default Callback Configuration, then all numbers using it will inherit the Voxology Autoresponder feature.
A. Go to the Manage Phone Numbers page in the Portal and select an SMS-enabled number.
B. Click on the Callback Configuration tab.
C. Disable the Inherit Default Callback Configuration from Application toggle.
D. Under the SMS/MMS Callback Configuration section, enable the Turn SMS autoresponder on toggle.
E. Click Save.
To enable the Voxology Autoresponder using the Update Callback Configuration API method, simply set the sms_autresponder.status property to “enabled”.
Update Callback Configuration // Example Request
curl -X PUT \
  'https://api.voxolo.gy/v1/CallFlows/Configurations/PhoneNumbers/%2B17145551213' \
  -H 'Cache-Control: no-cache' \
  -H 'Content-Type: application/json' \
  -H 'X-API-Key: YOUR_API_KEY' \
  -d '{
   "callback": {
       "method": "POST",
       "url": "https://your-callback-url.com",
       "headers": null,
       "content_type": "application/json",
       "timeout": 5
   },
   "callback_sms": {
       "method": "POST",
       "url": "https://your-sms-callback-url.com",
       "headers": null,
       "content_type": "application/json",
       "timeout": 5
   },
   "sms_autoresponder":{
       "status":"enabled"
   },
   "answer_on_ring": 1,
   "custom_data": {
       "custom": "data"
   },
   "log_callbacks_until": "2024-01-01T00:00:00.000Z",
}'
2. Text A Keyword To Your Number
Now that your number is configured with the Voxology Autoresponder, send any of the keywords listed above in the Keyword Detection section. If successful, you will receive an auto-response to your message and the Inbound Message HTTP Callback Request will detail which keyword was detected keyword_detected, the type keyword_type, and that an auto-response 'auto_response` was sent.
Bask in the simplicity of SMS compliance with Voxology.
Custom Autoresponder
Overview
There are cases where you may want to have an autoresponder that responds to inbound messages that don’t match the predefined keywords the Voxology Autoresponder responds to. This tutorial is a step-by-step guide to creating a custom SMS autoresponder using Call Flow Actions with Programmable Messaging.
Prerequisites
- 'Receive Messages' Tutorial // Make sure that you have completed the Receive Messages tutorial.
Tutorial
1. Create A Call Flow to automatically respond to incoming text messages
Now that you have an Inbound Phone Number on your Voxology Application, you can to write a Call Flow that automatically responds to inbound text messages. The example Call Flow below can be used for simplicity.
A. ‘Copy/Paste’ the example Call Flow below into a text editor.
{
  "actions": [
    {
      "$subscribeList": "['START', 'YES', 'SUBSCRIBE'].join()",
      "$unsubscribeList": "['STOP', 'NO', 'UNSUBSCRIBE'].join()",
      "$helpList": "['HELP', 'INFO'].join()"
    },
    {
      "$formattedMessage": "$textMessage.toUpperCase()"
    },
    {
      "type": "IF",
      "condition": "$subscribeList.indexOf($formattedMessage) !== -1",
      "then": [
        {
          "type": "SESSIONDATA",
          "session_data": {
            "response": "You have opted in."
          }
        },
        {
          "type": "GOTO",
          "params": {
            "label": "sendMessage"
          }
        }
      ]
    },
    {
      "type": "IF",
      "condition": "$unsubscribeList.indexOf($formattedMessage) !== -1",
      "then": [
        {
          "type": "SESSIONDATA",
          "session_data": {
            "response": "You have opted out."
          }
        },
        {
          "type": "GOTO",
          "params": {
            "label": "sendMessage"
          }
        }
      ]
    },
    {
      "type": "IF",
      "condition": "$helpList.indexOf($formattedMessage) !== -1",
      "then": [
        {
          "type": "SESSIONDATA",
          "session_data": {
            "response": "This is a helpful message."
          }
        },
        {
          "type": "GOTO",
          "params": {
            "label": "sendMessage"
          }
        }
      ]
    },
    {
      "type": "SESSIONDATA",
      "session_data": {
        "response": "You've sent an invalid response."
      }
    },
    {
      "type": "LABEL",
      "name": "sendMessage"
    },
    {
      "type": "SMS",
      "params": {
        "message": "${sessionData.response}"
      }
    }
  ]
}
B. Save as a JSON file.
Now you will need to host the Call Flow and configure your Callback Configuration to control the autoresponses from your Inbound Phone Number.
2. Host Call Flow
Your Call Flow now needs to be returned as the response to Voxology’s HTTP callback requests which are sent when an incomming SMS is received by your Phone Number. This can be done by either hosting the Call Flow as a static file in a cloud storage service where it can be fetched by the callback request, such as AWS S3, Azure or Google Cloud, or by programming your server to return the Call Flow in response to the callback request. We’ll use a static Call Flow hosted in AWS S3 for this guide.
A. Sign into the AWS Management Console and navigate to S3.
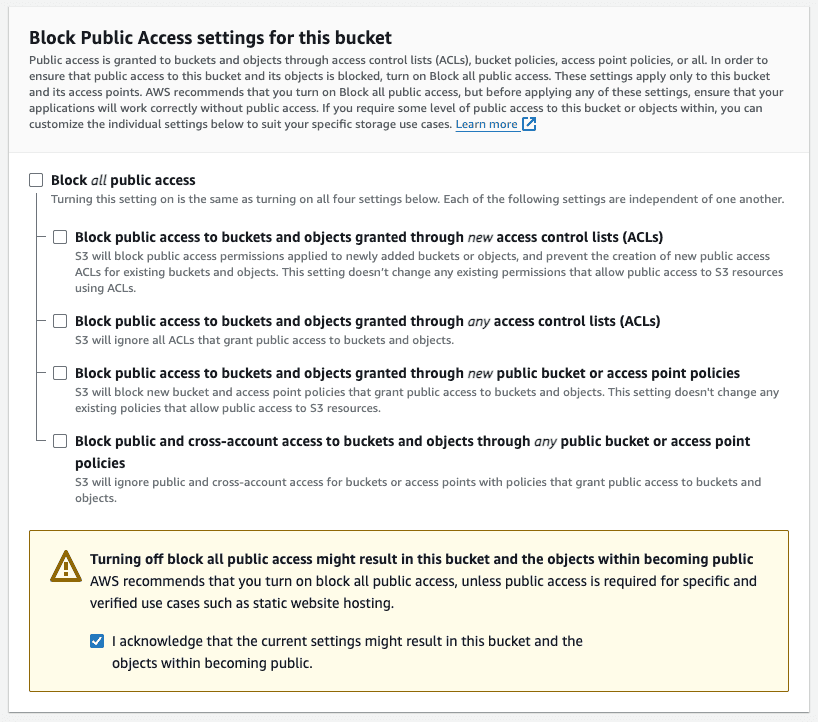
B. Create a new bucket and deselect the box that blocks public access.
C. Check the box acknowledging you are allowing objects in the bucket to be publicly available.
D. Click Create Bucket.
E. Upload the JSON file you created with the Call Flow script.
F. Once uploaded, click the object to view the Properties and ‘Copy’ the Object URL.
3. Define Your Phone Number’s HTTP Callback Configuration
To enable custom auto-response messaging from your number, you need to tell Voxology where to fetch your instructions. When a text comes in, we will make a request to your server or CDN and expect you to tell us what to do next using our list of Call Flow Actions.
A. Go to Manage Inbound Phone Numbers page in the Portal and select the number you want to configure.
B. Click on the Callback Configuration tab.
C. Disable the Inherit Default Callback Configuration from Application toggle and then enable the Designated a Callback URL to where Voxology will send Callback Requests toggle to display the Callback Configuration form.
D. 'Copy/Paste' the "Object URL" to your JSON script into the Callback URL field.
E. Set the Callback Method field to
GET.
F. Click Save.
NOTE: You can also set the HTTP callback configuration using the Update Call Flow Configuration method.
4. Text Your Number
Once you’ve configured your number, send a text message with one of the keywords:
START,YES,SUBSCRIBESTOP,NO,UNSUBSCRIBEHELP,INFO
You should receive a text message back with the corresponding response.
Congratulations! Your Voxology phone number can now return automated response messages. Next, you can point your number to a URL on your own server or CDN and start building intelligent SMS auto-responses into your application.